
Tip 1: Before pressing, clean your drinkware
Before attaching your print to your blank, make sure to clean it to remove any fingerprints or particles that may be on the surface. Either can leave smudges or specks on your finished product. For hard surfaces like tumblers or mugs, we recommend using denatured alcohol and a lint free cloth. Can’t find denatured alcohol? Use isopropyl alcohol that is at least 90%.
Tip 2: Tape your print to your blank well
Use heat resistant tape to attach your print to your blank. It’s important to tape it tightly and to not only tape the ends, but the top and bottom as well. It is important that the paper is very tightly secured to the blank. When the heat is applied, if the paper is too loose, the ink gas may not go straight into the blank and may instead escape. Gassing as it often called, will result in streaks of blurred color across your image.
Tip 3: Remove the transfer right after removing the tumbler from the press
For some stainless steel tumblers, leaving the paper on the tumbler for too long after pressing will cause it to stick. The best thing to do is remove it as quickly as possible to keep this from happening. If you are using shrink wrap on your drink ware and placing it in a convection oven, remove the shrink wrap and transfer as soon as you remove the tumbler from the press. The longer the shrink wrap stays on the drink ware, the harder it is to remove.
Tip 4: If the paper does stick, remove it with soap and water
If the paper does stick to your tumbler, don’t panic. Soap and water will remove any paper that may remain. Because sublimation becomes a part of the coating, removing something stuck to the surface will not damage the design. In addition to removing the transfer paper shortly after pressing, other things you can do to prevent this from happening again is to reduce the pressure and the time. If the pressure is too high, it can cause the paper to stick. This happens with time as well. Try dropping your time in intervals of 5 seconds to see if this eliminates the issue.
Tip 5: Make sure you are using the right press for the right product
There are three main types of presses that can be used for drink ware: mug presses, tumbler presses, and convection ovens. It’s important to know which press is best for your project.
Mug presses are designed specifically for 11oz and 15oz ceramic mugs. This type of press is a very cost effective solution for these products. There are work arounds for other products, but it is best for ceramic mugs. You can also press enamel camp style mugs in a mug press. You’ll need to add a silicone pad which will make the width even with the lip of the cup. Then, you’ll put the mug in the press upside down.
A tumbler press the is adjustable is great for stainless steel tumblers. This will also you to match the pressure to a variety of sizes of tumblers. Ceramic mugs will work well in a tumbler press as well, so this is a great option for the widest variety of drink ware.
If you are pressing drink ware that is curved or tapered, a sublimation oven is a great options. For these convention ovens, you’ll tape the design in place and then use shrink wrap to hold it tightly in place.
Tip 6: For designs that fully wrap around the tumbler, rotate halfway through pressing
Skinny tumblers with a design that wraps completely around the tumbler are very trendy products. To get a design to fully wrap around the tumbler, set your tumbler press for the full time suggested by your dealer. At the halfway point, open the press and rotate the tumbler at least 45 degrees. Close the press back and let it run for the remaining time. To eliminate needing to rotate, you can sublimate these items in a Sublimation Convention Oven by using shrink wrap.
Tip 7: If your colors are off, adjust your temperature
If your colors are off after pressing, observing how they are off may give you the answer to correcting the issue. In general, blacks that look to be greenish are generally under cooked. Up your press temperature in increments of 5 degrees. If your blacks are tending to be a bit brown, the design is getting too much heat. Reduce your temperature in increments of 5 degrees. Another great early step to take is to print a nozzle check from your printer. You can do this from the devices page under settings in PrintMate or from the LCD panel on the printer. If you are seeing any breaks, which are missing boxes, on the nozzle check, you have clogged nozzles that are probably causing your color issues and you can troubleshoot from there. If your nozzles are fine, start looking at your process, specifically your time, temperature, and pressure.
Tip 8: Check your Dealer site for pressing instructions
The best place to start with any sublimation project is on your Dealer’s website. Dealers will often include pressing instructions, as well as tips and tricks, on the product listing page. These are a huge help to make sure you are getting the best results when pressing your products. While we can provide general guidelines for pressing certain blanks, the information on your Dealer’s page is specific to their product.
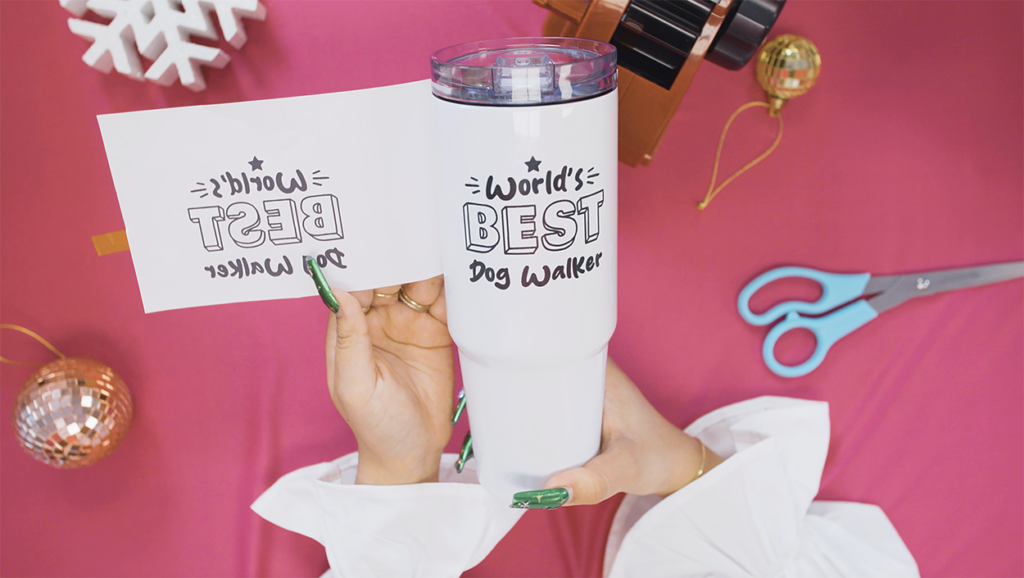
Tip 9: Make sure your paper is lined up to get the best result
When you are attaching your print to your blank, make sure the it lines up so that your design is not skewed on the final product. One easy way to do this is have an edge that is uncut, which will make it easiest to line up one end with the other. When you do have to cut the paper, make sure that you are using rulers to keep your edges as even as possible. Using an additional light source, like a light box, is a good way to see exactly how your design in lined up on your product before pressing.

Tip 10: Remove any accessories before putting your tumbler in the press
Tumblers often come with removable pieces like straws, lids, and sometimes handles. These need to be removed before pressing. For one, they could impact you getting an even and consistent press. Also, these items are often made of plastic and can melt or warp in the press.
There you have it; our top tips for helping you get the best result when pressing tumblers. Join the MySawgrass community for more tips from our sublimation community!


