
Tools and Supplies to Make it:
- Sawgrass SG500 or SG1000 Printer
- Sawgrass VersiFlex Inks
- TruePix Paper
- Flat Heat Press
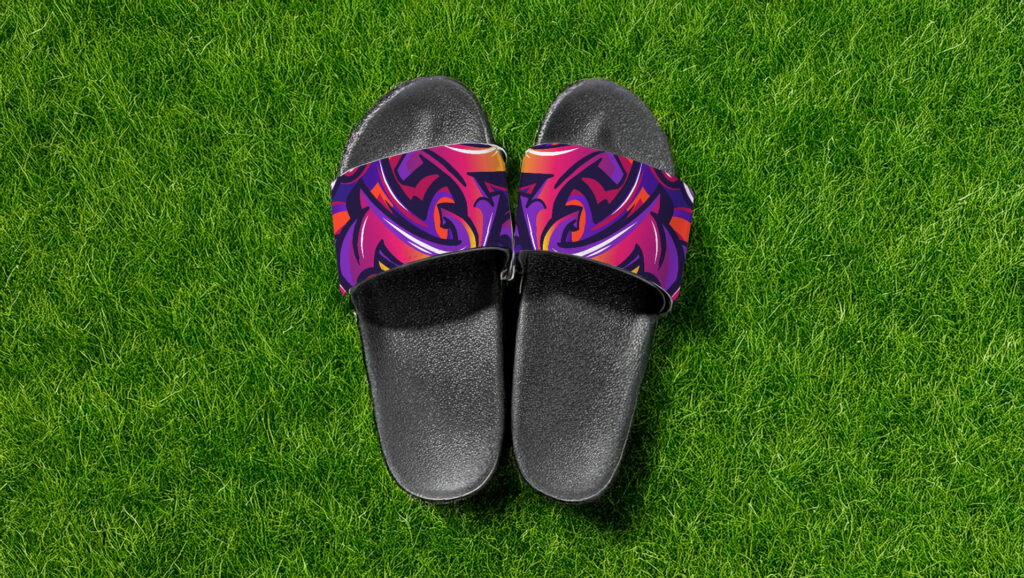
- Vegan Leather Slide Sandals
How to Make It:
- For this project, we are using the slide style sandals many of our dealers carry
- In the Sawgrass Print Utility, we chose Polyester for the product.
- We printed this on 8.5″x 11″ TruePix paper
How to Press It:
- Turn on your press on and set the temperature to 375F (191C) degrees
- If you see any dust, lint roll your print area to make sure your surface is clean.
- Place your slide on the press and line the paper up on top as you place it on the product.
- Cover with blow out paper.
- Press the slide for 90 seconds at Medium pressure.
- When finished, remove the sandal from the press and peel the paper off as quickly as possible.
Tips & Tricks:
- Since the sublimation panel on this show is not removable, you will need to position the shoe so only the panel is under the press. You can hold the shoe while pressing to help it from sliding.
- Need inspiration? Our background patterns in the MySawgrass design tool would work great on these shoes.

Tools and Supplies to Make it:
- Sawgrass SG500 or SG1000 Printer
- Sawgrass VersiFlex Inks
- TruePix Paper
- Flat Heat Press
- Polyester Polo Shirt
How to Make It:
- For this project, we are using a polyester polo shirt that is carried by many of our dealers or can be found at a clothing store.
- In the Sawgrass Print Utility, we chose Polyester for the product.
- We printed this on 8.5″x 11″ TruePix paper
How to Press It:
- Turn on your press on and set the temperature to 400F (204C) degrees
- If you see any dust, lint roll your print area to make sure your surface is clean.
- Place your shirt on the press and line the paper up on top as you place it on the product.
- Cover with blow out paper.
- Press the shirt for 45 seconds at HIGH pressure.
- When finished, remove the shirt from the press and remove the transfer paper
Tips & Tricks:
- The press can leave a line around the design where the edges of the paper were. To avoid this, you can rip the edges of the page.
- To get the best results, the surface needs to be as even and flat as possible. Try to position the shirt in the press so that the collar and buttons are not in the press area. If this is not possible, place a pressing pillow in the shirt.

Tools and Supplies to Make it:
- Sawgrass SG500 or SG1000 Printer
- Sawgrass VersiFlex Inks
- TruPix Classic Paper
- Tumbler & Mug Press
- Ceramic Mug
How to Make It:
- For this project, we are using a sublimation mug.
- In the Sawgrass Print Utility, we chose Ceramic for the product.
- We printed this on “8.5×11” TruePix Paper
How to Press It:
- Turn on your press on and set the temperature to 400F (191C) degrees
- Wrap your design around the mug and use heat resistant tape to secure the design.
- Place mug in press and close it.
- Press the mug for 200 seconds at medium pressure.
- When finished, remove the mug from the press and remove the sublimation transfer paper.
Tips & Tricks:
- Mugs can also be pressed in an automatic mug press. Follow directions to increase time and temp if needed.
- One of the most versatile sublimation products, mugs can be used as a company giveaway, and also make great personalized gifts.
Tools and Supplies to Make it:
- Sawgrass SG500 or SG1000 Printer
- Sawgrass VersiFlex Inks
- TruePix Paper
- Flat Heat Press
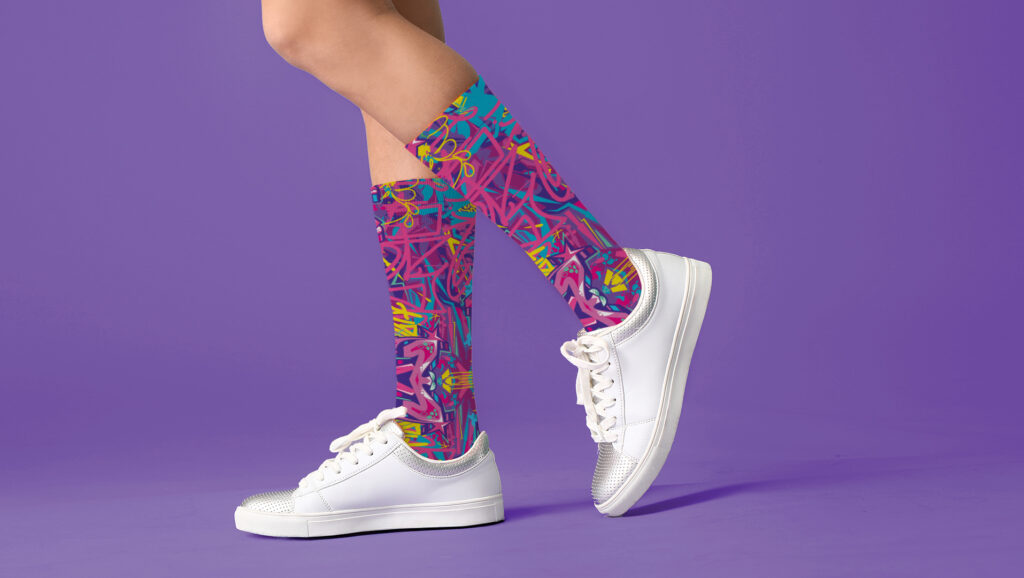
- Polyester Socks
How to Make It:
- For this project, we are using polyester socks that are carried by many of our dealers.
- In the Sawgrass Print Utility, we chose Polyester for the product.
- We printed this on 8.5″x 14″ TruePix paper
How to Press It:
- Turn on your press on and set the temperature to 400F (204C) degrees
- If you see any dust, lint roll your print area to make sure your surface is clean.
- Place your sock on the press and line the paper up on top as you place it on the product.
- Cover with blow out paper.
- Press the fabric for 45 seconds at HIGH pressure.
- When finished, remove the fabric from the press and remove the transfer paper
Tips & Tricks:
- Socks can be pressed one side at a time. Make sure the design is large enough to wrap around the edges. This gives you a seamless look.
- Using a sock form in the sock will help keep the sock stretched and make sure that the full area is sublimated.
Tools and Supplies to Make it:
- Sawgrass SG500 or SG1000 Printer
- Sawgrass VersiFlex Inks
- TruPix Classic Paper
- Tumbler Press
- Stainless Steel Sublimation Water Bottle
How to Make It:
- For this project, we are using a sublimation stainless steel water bottle.
- In the Sawgrass Print Utility, we chose Tumbler for the product.
- We printed this on “8.5×11” TruePix Paper
How to Press It:
- Turn on your press on and set the temperature to 380F (193C) degrees
- Wrap your design around the tumbler and use heat resistant tape to secure the design.
- Place bottle in press and close it.
- Press the bottle for 60 seconds at medium pressure.
- Once finished, open press, rotate the bottle and press for another 60 seconds.
- When finished, remove the bottle from the press and remove the sublimation transfer paper.
Tips & Tricks:
- Rotating the water bottle half way through pressing allows you to do a full wrap design.
- Make sure the transfer paper is pulled tight and taped all the way around the water bottle to help get a smooth and consistent press.
Tools and Supplies to Make it:
- Sawgrass SG500 or SG1000 Printer
- Sawgrass VersiFlex Inks
- VersiFlex Light Paper
- Flat Heat Press
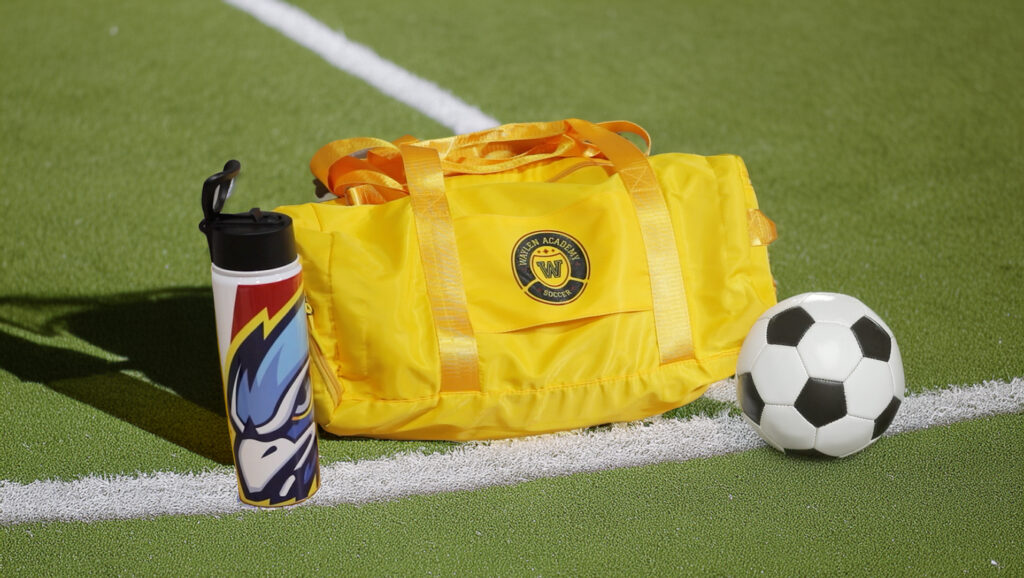
- Nylon Duffle Bag
How to Make It:
- For this project, we are using a nylon duffle bag we picked up at a local clothing store
- In the Sawgrass Print Utility, we chose Natural Fabrics for the product.
- We printed this on 8.5″x 11″ VersiFlex Light paper
How to Press It:
- Turn on your press on and set the temperature to 375F (191C) degrees
- If you see any dust, lint roll your print area to make sure your surface is clean.
- Place your fabric on the press and line the paper up on top as you place it on the product.
- Cover with blow out paper.
- Press the fabric for 30 seconds at VERY HIGH pressure.
- When finished, remove the fabric from the press and peel the paper off as quickly as possible.
Tips & Tricks:
- Pressing works best when the surface is as flat as possible. For a product like this bag, remove all accessories you can and then place a pressing pillow in the bag to make the surface as even as possible.
- When deciding what material to choose in the Sawgrass Print Utility, the decision depends on what paper you need to use. Whether the fabric is natural or synthetic, if it is not 80% or more polyester, you will choose Natural Fibers and use the VersiFlex Light Paper.

Skill Level: Beginner
Tools & Supplies to Make It:
- MySawgrass+ Membership
- Sawgrass SG500 or SG1000 Printer
- Sawgrass Sublijet UHD Inks
- TruePix paper
- Flat Press
- 8.5”x14” or larger sublimation paper
- Aluminum License Plate
- Heat Tape
How to Create It:
- Log into MySawgrass and from the Landing Page choose Design.
- For your product, select the Aluminum License Plate by opening the Auto category or by using the search bar.
- On the Create Your Design Panel, click on Designs. Click on the filter icon and then select Graduation and click apply.
- Choose the Class Dismissed Era design.
- Select any portion and resize to fit your plate better.
- If you’d like to change the colors, select the portion you want to change and then edit those color values on the left color panel.
- Once the design is complete, hit the Print button and then on the Print Screen click on Print File.
How to Print It:
- You should get a popup that asks if you want to open Sawgrass Print Utility. You will need to click Open Sawgrass Print Utility. If you are not seeing this, you’ll need to disable your popup blocker.
- In Sawgrass Print Utility, start by scrolling down and making sure your print orientation is set to Landscape.
- For this project, use the preset for Metal Sign/Plaque.
- Make sure that the media size and type match what you have in the printer.
- On the Color Management Tab, we suggest having the Color Mode set to Vivid.
- When you’ve confirmed all of your settings, Hit Print.
How to Press It:
- Turn your press on and set the temperature to 400 degrees and the time to 60 seconds.
- To remove any dust, wipe down the license plat4e with alcohol and a lint free cloth.
- Tape your image down to the plate.
- Place the license plate in the heat press and close.
- Wait 60 seconds before lifting the lid and removing the plate.
Tips & Tricks:
- If you have an SG500, while the main tray is set up for letter paper, it can be extended for legal paper, which is perfect for this project. Open your tray and push the two small green tabs on the the side to release the tray and then pull it out to make it longer. Make sure to snap the tabs in place to keep them the tray from sliding.
- If you are changing colors in this design, the layer panel can be used to select elements and to move them forward and backwards. Items at the top of the list are in the front of the design and items further down the list are further back.
Skill Level: Beginner
Tools & Supplies to Make It:
- MySawgrass+ Membership
- Sawgrass SG500 or SG1000 Printer
- Sawgrass Sublijet UHD Inks
- TruePix paper
- Flat Press
- 8.5”x11” or larger sublimation paper
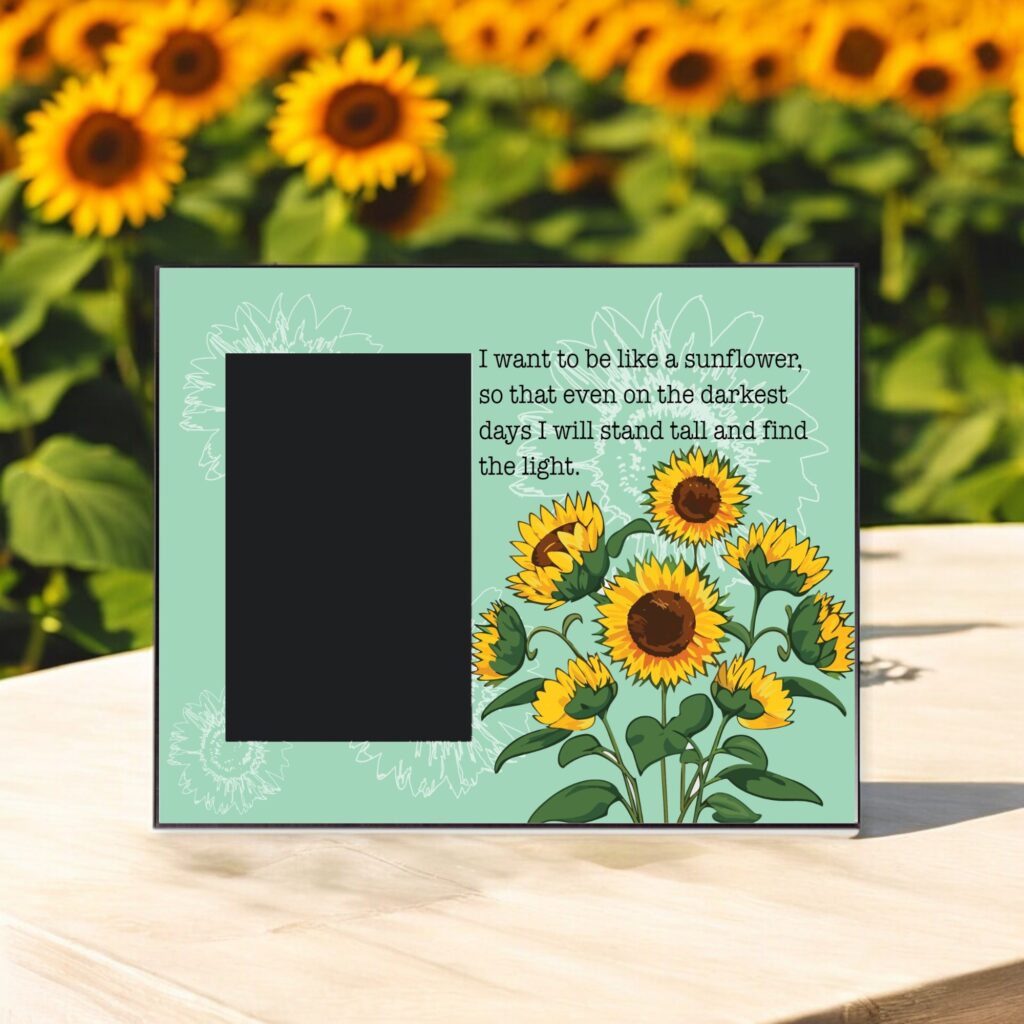
- Hardboard Offset Frame
- Heat Tape
How to Create It:
- Log into MySawgrass and from the Landing Page choose Design.
- For your product, select the Hardboard Offset Frame for 4″x6″ (Landscape) by opening the Home Decor category or by using the search bar.
- On the Create Your Design Panel, click on Designs. Click on the filter icon and then select SPRING and click apply.
- Choose the Be Like a Sunflower design.
- Select any portion and resize to fit your frame better.
- You can change the text by clicking on the text field and then edit it by using the text panel on the left.
- Once the design is complete, hit the Print button and then on the Print Screen click on Print File.
How to Print It:
- You should get a popup that asks if you want to open Sawgrass Print Utility. You will need to click Open Sawgrass Print Utility. If you are not seeing this, you’ll need to disable your popup blocker.
- In Sawgrass Print Utility, start by scrolling down and making sure your print orientation is set to Landscape.
- For this project, use the preset for Hardboard Sign/Plaque.
- Make sure that the media size and type match what you have in the printer.
- On the Color Management Tab, we suggest having the Color Mode set to Vivid.
- When you’ve confirmed all of your settings, Hit Print.
How to Press It:
- Turn your press on and set the temperature to 400 degrees and the time to 60 seconds.
- To remove any dust, wipe down the frame with alcohol and a lint free cloth.
- Tape your image down to the frame
- Place the frame in the heat press and close.
- Wait 60 seconds before lifting the lid and removing the frame.
Tips & Tricks:
- This is a thicker item. Make sure to set your press before turning it on. Also, remove the glass before pressing if it is in place.
- To prevent damage to the product, it is best to wrap the paper to the back of the frame and tape it there instead of to the side.

Skill Level: Advanced
Tools & Supplies to Make It:
- MySawgrass+ Membership
- Sawgrass SG1000 Printer
- Sawgrass Sublijet UHD Inks
- TruePix paper
- Flat Press
- 11”x17” or larger sublimation paper
- Aluminum Scalloped Wind Spinner
- Heat Tape
How to Create It:
- Log into MySawgrass and from the Landing Page choose Design.
- For your product, select the Aluminum Scalloped Wind Spinner by opening the Home Decor category or by using the search bar.
- On the Create Your Design Panel, click on Designs. Click on the filter icon and then select SPRING and click apply.
- Choose the Yellow Floral Monogram design.
- This design fits well in the area, but you can select any portion and resize to fit your spinner better.
- To customize the monogram, click the text field and edit using the text panel.
- Once the design is in place, hit the Print button and then on the Print Screen click on Print File.
How to Print It:
- You should get a popup that asks if you want to open Sawgrass Print Utility. You will need to click Open Sawgrass Print Utility. If you are not seeing this, you’ll need to disable your popup blocker.
- In Sawgrass Print Utility, start by scrolling down and making sure your print orientation is set to Portrait.
- For this project, use the preset for Metal Sign/Plaque.
- Make sure that the media size and type match what you have in the printer.
- On the Color Management Tab, we suggest having the Color Mode set to Vivid.
- Increase the number of copies to 2.
- When you’ve confirmed all of your settings, Hit Print.
How to Press It:
- Turn your press on and set the temperature to 400 degrees and the time to 60 seconds.
- To remove any dust, wipe down the wind spinner with alcohol and a lint free cloth.
- Tape your image down to the spinner
- Place the wind spinner in the heat press and close.
- Wait 60 seconds before lifting the lid and removing the wind spinner.
- Repeat the process for the second side.
Tips & Tricks:
- For the proper effect, you’ll need to add the same design to the front and back of the wind spinner.
- Because of the holes in the product, you will need to either be very careful when taping to make sure the color does not ghost onto the other side or press both sides at once. If you use this method, reduce the time to 45 seconds per side and drop the temperature slightly.

Skill Level: Intermediate
Tools & Supplies to Make It:
- MySawgrass+ Membership
- Sawgrass SG500 or SG1000 Printer
- Sawgrass Sublijet UHD Inks
- TruePix paper
- Flat Press
- 8.5”x11” or larger sublimation paper
- Vegan Leather Sublimation Notebook
- Heat Tape
How to Create It:
- Log into MySawgrass and from the Landing Page choose Design.
- For your product, select the A5 Faux Leather Notebook by opening the School & Office category or by using the search bar.
- On the Create Your Design Panel, click on Designs. Click on the filter icon and then select MOM and click apply.
- Choose the Garden Mom Story design.
- This design was made specifically for the notebook, so once you click, it should fill the artboard seamlessly.
- If you’d like to customize the text, click the text field and edit using the text panel.
- Once the design is in place, hit the Print button and then on the Print Screen click on Print File.
How to Print It:
- You should get a popup that asks if you want to open Sawgrass Print Utility. You will need to click Open Sawgrass Print Utility. If you are not seeing this, you’ll need to disable your popup blocker.
- In Sawgrass Print Utility, start by scrolling down and making sure your print orientation is set to Portrait.
- For this project, since the cover is fabric, you can use the preset Polyester T-Shirt.
- Make sure that the media size and type match what you have in the printer. On the Color Management Tab, we suggest having the Color Mode set to Vivid.
- When you’ve confirmed all of your settings, Hit Print.
How to Press It:
- Turn your press on and set the temperature to 390 degrees and the time to 60 seconds.
- Prepare your notebook by using a lint roller to remove any dust or fibers.
- Tape your image down to the notebook
- Place the notebook in the heat press and close.
- Wait 45 seconds before lifting the lid and removing the notebook.
Tips & Tricks:
- Make sure to wrap the print around the edges of the notebook to get print on the sides of cover.
- For inside of the cover, tape the paper to the paper instead of to the book itself to prevent damage to the book.