
- Turn off mirroring before printing
- Acrylic creates a 3D like effect because it is pressed onto the back and then viewed from the front. This creates a unique look and depth. Because you are pressing onto the back, you do not need to mirror your design. If you are using the Acrylic Preset in PrintMate, mirror will automatically be turned off for you.
- Use a silicone pad when pressing to protect your blank.
- When pressing both acrylic and glass, it is recommended that you add a silicone pad between the blank and the top of the press. This helps to cushion the blank and keep it from cracking. Always check your press depth with acrylic items because they are often much thicker than other products, especially when you add the silicone pad. Pressure for acrylic items is also going to be more on the lighter side.
- Avoid putting tape directly on the product.
- While heat resistant tape is integral to getting a good press, it’s best to avoid taping directly to the acrylic blank as it can cause discoloration. The best option is to use a larger than necessary sheet of paper and tape the paper tightly to itself.
There are your tips for pressing on acrylic. It’s a really product, so make sure to tag us when you show off your acrylic results!
You can find more about him and his work at https://99designs.com/profiles/3692880.
1. Where did you grow up, and how did it influence your art?
I grew up in Jakarta, capital city of Indonesia, until high school, and then I moved to another city to go to college. I grew up listening to metal/rock music, skateboarding and being in a band, and I guess looking at skateboard deck and t-shirt graphics really influenced my art and made me want to be a graphic designer/ illustrator.
2. Who inspired your love of art?
Many artists inspired me such as Ed Templeton (designer/owner of toy machine skateboard), Don Leon for his amazing talent in vintage cartoon/mascot illustration, Richey Beckett for his amazing and detailed ink illustration, John Dyer Baizley for his phenomenal watercolor and pointillism illustration.
3. How did you discover your talent for design?
I don’t know about talent, but I have always liked to draw since I was in elementary school. I remember my mom always scolding me because I drew something on my schoolbook instead of writing school lessons. When I started learning about graphic design and digital illustration. I was in my second year of college (even though I was an economics major lol). My friend introduced me to the world of graphic design and illustration and told me that you can earn money from it, and it blew my mind. I started to take graphic design and illustration seriously and learned about it more and more, and I have kept learning since then. I don’t have talent, I just keep learning and practicing to be better.
4. What would we find you listening/watching while creating?
I usually listen to music like 80s Japanese city pop, Korean artist Yerin Baek, Mac Ayres, and many more while creating, most of them is just a chill and calm music, it helps keep me focus on my work.
5. Any tips for breaking through a creative block?
For me, learning a new drawing style makes me excited and makes me see art from a different perspective and helps me break my creative block.
6. How have you built confidence over the course of your career?
Building my confidence is not an easy task for me, there has been moments where I always compared myself with other artist and questioned myself why can’t I be as good as them and the thought of it makes me want to give up but I have learned that a good break from creating and focus on practicing my skill rather than comparing myself with other artists helps a lot with my confidence and to this day I never compare myself with others anymore.
7. Where do you find inspiration for your art?
I find inspiration everywhere. Inspiration can come from just seeing a graphic from a t-shirt my friend’s wearing, seeing my artist friends work or just by browsing online on Instagram, Behance, dribble and Pinterest.
8. What’s a piece of advice you would give young creators looking to pursue a career in the arts?
My advice for young creators looking to pursue a career in the arts is to believe in yourself, always eager to learn new things, practice as much as you can, widen your horizon and maybe go to an art exhibition or a museum to learn and appreciate art.
9. Who inspires the collection you’ve designed this month?
The collection I have designed this month is a collection that celebrates the style of old school American uncles in general, the inspiration comes from vintage label beer design, vintage band t-shirts, plaid and camo pattern and trucker hats and a little bit of patriotism to capture the vibes of American uncle.
10. If you could visit with your ten-year-old self and tell them one thing, what would it be?
If I could visit my ten years old self, I would tell him, “There will be a time where you have to decide something that can impact your future, don’t take it lightly or you will regret it.”
Skill Level: Basic
Tools & Supplies to Make It:
- MySawgrass+ Membership
- Sawgrass SG500 or SG1000 Printer
- 15”x15” or larger Flat Press
- 8.5”x11” or larger sublimation paper
- Apron
- Lint Roller
- Heat Tape
- Blowout Paper
How to Create It:
- Log into MySawgrass and from the Landing Page choose Design.
- For your product, select the Adult April with Pocket. It can be found under Kitchen and Dining.
- On the Create Your Design Panel, click on Designs. Click on the filter icon and then select Dad and click apply.
- Choose the Dad Joke Trophy design.
- The design should come in at the correct size. If you wanted to make the image smaller, use your mouse and lasso around the elements to group them.
- When your design is finished, hit the Print button to send your job to the Sawgrass Print Utility.
How to Print It:
- You should get a popup that asks if you want to open Sawgrass Print Utility. You will need to click Open Sawgrass Print Utility. If you are not seeing this, you’ll need to disable your popup blocker.
- In the Sawgrass Print Utility, start by scrolling down and making sure your print orientation is set to Portrait.
- The file will come in with the dimensions of the print area. Under Design Files, click on Crop to Image Size so you are seeing the true image dimensions.
- For this project, you can use the preset Polyester T-Shirts.
- Make sure that the media size and type match what you have in the printer. T-shirts are set up for tabloid, but if you want a smaller design, set your paper size and then go to design files and click Fit to Paper Size.
- On the Color Management Tab, we suggest having the Color Mode set to Vibrant.
- When you’ve confirmed all of your settings, Hit Print.
How to Press It:
- Turn your press on and set the temperature to 385 degrees and the time to 45 seconds. Pressure should be medium.
- Prepare your apron by using a lint roller to remove any fibers or dust.
- Place your design face down on the tea towel and tape it down.
- Place the apron on the lower platen of the press with the printed page on top.
- Place a piece of blowout paper on top.
- Close the press and wait 45 seconds before opening the press and removed the apron.
Tips & Tricks:
- Getting lines on your fabric items? Ripping the edges of paper helps prevent those hard lines.
- You can alter the size of the design to fit your paper and printer. When you lasso the design to resize in the design tool, you’ll see the dimensions. Use the resize icon to reduce the image size until it fits on your paper.
Skill Level: Intermediate
Tools & Supplies to Make It:
- MySawgrass+ Membership
- Sawgrass SG500 or SG1000 Printer
- Flat Press
- “8.5×11” or larger sublimation paper
- Hardboard Magnet
- Alcohol and a lint free cloth
- Heat Tape
- Blowout Paper
How to Create It:
- Log into MySawgrass and from the Landing Page choose Design.
- For this project, we’re going to use a custom canvas. At the bottom of the Select a Blank Product panel, choose Open Custom Canvas.
- On the Design Your Canvas Panel, click on Die cut shapes. Choose the Circle.
- Set the width and height to 2.25” and the bleed to .125”.
- Click Design your canvas.
- On the Create Your Design Panel, click on Designs. Click on the filter icon and then select Outdoors and click apply.
- Choose the Explore design.
- Use your mouse as a lasso to select the entire image. Then use the Move Icon and Resize Icon to re-size and center the design.
- In the Create your design panel, click on Elements and then Backgrounds.
- To add the background, in the hex code field add code 6FABB8.
- When your design is finished, hit the Print button to send your job to Sawgrass Print Utility.
- You should get a popup that asks if you want to open Sawgrass Print Utility. You will need to click Open Sawgrass Print Utility. If you are not seeing this, you’ll need to disable your popup blocker.
- To complete the next magnet, in DesignMate, click on Save Canvas button and give your design a name and category before clicking Continue.
- Give your design a Product Name and description before clicking Save.From your My Studio page click New Creation.
- For the second magnet, we’re going to use another custom canvas.
- At the bottom of the Select a Blank Product panel, choose Open Custom Canvas.
- On the Design Your Canvas Panel, click on Die cut shapes. Choose the Square.
- Set the width and height to 2.25” and the bleed to .125”.
- Click Design your canvas.
- On the Create Your Design Panel, click on Designs. Click on the filter icon and then select Outdoors and click apply.
- Choose the Joshua Tree design.
- Use your mouse as a lasso to select the entire image. Then use the Move Icon and Resize Icon to re-size and center the design.
- In the Create your design panel, click on Elements and then Backgrounds.
- To add the background, in the hex code field add code EAB154.
- When your design is finished, hit the Print button to send your job to PrintMate.
- Make sure that you are seeing the popup to Open PrintMate and are hitting Open PrintMate. If you are not seeing this, you’ll need to disable your popup blocker.
- To complete the final magnet, in DesignMate, click on Save Canvas button and give your design a name and category before clicking Continue.
- Give your design a Product Name and description before clicking Save.From your My Studio page click New Creation.
- For the final magnet, we’re going to use another custom canvas.
- At the bottom of the Select a Blank Product panel, choose Open Custom Canvas.
- On the Design Your Canvas Panel, click on Die cut shapes. Choose the Rounded Square.
- Set the width to 2.25” and height to 3”. and the bleed to .125”.
- Click Design your canvas.
- On the Create Your Design Panel, click on Designs. Click on the filter icon and then select Outdoors and click apply.
- Choose the Stay Wild design.
- Use your mouse as a lasso to select the entire image. Then use the Move Icon and Resize Icon to re-size and center the design.
- In the Create your design panel, click on Elements and then Backgrounds.
- To add the background, in the hex code field add code F19359.
- When your design is finished, hit the Print button to send your job to Sawgrass Print Utility.
How to Print It:
- You will see that all three jobs came into the Sawgrass Print Utility as separate tabs.
- On one tab, next to Design Files, choose your other files from the Select a Job pulldown.
- Then click Merge Into Tab.
- Your three magnets will now all be on one page. You can add spacing to put them further apart on the page to make it easier to sublimate them later.
- In Sawgrass Print Utility, start by scrolling down and making sure your print orientation is set to Portrait.
- For this project, you can use the preset Hardboard Keychain.
- Make sure that the media size and type match what you have in the printer.
- On the Color Management Tab, we suggest having the Color Mode set to Vibrant.
- When you’ve confirmed all of your settings, Hit Print.
How to Press It:
- Prepare your magnets with a lint free cloth and alcohol to remove any fibers or fingerprints.
- Place your design face down on each magnet and tape it down.
- Place the magnets on the lower platen of the press with the printed page on top.
- Place a piece of blowout paper on the bottom and top.
- Close the press and wait 60 seconds before opening the press and removed the pressed magnets.
Tips & Tricks:
- This is a very versatile project. You can use any size or material of magnet, just adjust the size in custom canvas.
- There are two methods to pressing small items. Some people will cut out the individual designs, leaving a little white around the edges, and tape the magnets to the design before pressing. Other users just add space and tape the magnets to the page instead of having individual pieces.
Skill Level: Beginner
Tools & Supplies to Make It:
- MySawgrass+ Membership
- Sawgrass SG1000 Printer
- Flat Press
- “11×17” or larger sublimation paper
- 11”x14” Chromalux Panel
- Alcohol and a lint free cloth
- Heat Tape
- Blowout Paper
How to Create It:
- Log into MySawgrass and from the Landing Page choose Design.
- For this project, we’re going to use a custom canvas. At the bottom of the Select a Blank Product panel, choose Open Custom Canvas.
- On the Design Your Canvas Panel, click on Die cut shapes. Choose the Square.
- Set the width to 11” and height to 14”. Set the bleed to .125”.
- Click Design your canvas.
- On the Create Your Design Panel, click on Designs. Click on the filter icon and then select Food and Drink and click apply.
- Choose the Pink Food Truck Menu design.
- Use your mouse as a lasso to select the entire image. Then use the Move Icon and Resize Icon to re-size and center the design.
- If you need to change the food images, in the Create your design panel, click on Elements and then Graphic Elements.
- Click on the filter icon and then select Food and Drink and click apply.
- Select an item by clicking on it, and then use the Move Icon and Resize Icon to re-size and position the image.
- You can use the Trashcan Icon to delete images you no longer need..
- Click on any test to change the wording or the price.
- When your design is finished, hit the Print button to send your job to the Sawgrass Print Utility.
- You should get a popup that asks if you want to open Sawgrass Print Utility. You will need to click Open Sawgrass Print Utility. If you are not seeing this, you’ll need to disable your popup blocker.
How to Print It:
- In the Sawgrass Print Utility, start by scrolling down and making sure your print orientation is set to Portrait.
- For this project, you can use the preset Metal Sign.
- Make sure that the media size and type match what you have in the printer.
- On the Color Management Tab, we suggest having the Color Mode set to Vibrant.
- When you’ve confirmed all of your settings, Hit Print.
How to Press It:
- Turn your press on and set the temperature to 400 degrees Fahrenheit and the time to 1 minute (60 seconds).
- Prepare your sign with a lint free cloth and alcohol to remove any fibers or fingerprints.
- Place your design face down on the sign and tape it down.
- Place the sign on the lower platen of the press with the printed page on top.
- Place a piece of blowout paper on the bottom and top.
- Close the press and wait 60 seconds before opening the press and removed the pressed sign.
Tips & Tricks:
- While we used 11”x14”, you can adjust this to any size of metal that you have on hand.
- Selling Tip: Food Truck Festivals often have vender tables as well. You can carry signs like these with you as samples. They will often walk around on breaks, or you can approach them with your samples during slow times.
Skill Level: Beginner
Tools & Supplies to Make It:
- MySawgrass+ Membership
- Sawgrass SG1000 Printer
- Flat Press
- “11×17” sublimation paper
- Clipboard with flat clip
- Alcohol and a lint free cloth
- Heat Tape
- Blowout Paper
How to Create It:
- Log into MySawgrass and from the Landing Page choose Design.
- For this project, we’re going to use a custom canvas. At the bottom of the Select a Blank Product panel, choose Open Custom Canvas.
- On the Design Your Canvas Panel, click on Die cut shapes. Choose the Square.
- Set the width to 9” and height to 12.5”. Set the bleed to .125”.
- Click Design your canvas.
- On the Create Your Design Panel, click on Designs. Click on the filter icon and then select Thank You and click apply.
- Choose the Work of Heart design.
- Use your mouse as a lasso to select the entire image. Then use the Move Icon and Resize Icon to re-size and center the design.
- In the Create your design panel, click on Elements and then Backgrounds.
- To add the background, in the hex code field add code FFCD00.
- If the clipboard is for a teacher, click on the text and use the box on the left to change it.
- When your design is finished, hit the Print button to send your job to the Sawgrass Print Utility.
- You should get a popup that asks if you want to open Sawgrass Print Utility. You will need to click Open Sawgrass Print Utility. If you are not seeing this, you’ll need to disable your popup blocker.
How to Print It:
- In the Sawgrass Print Utility, start by scrolling down and making sure your print orientation is set to Portrait.
- For this project, you can use the preset Hardboard Sign/Plaque.
- Make sure that the media size and type match what you have in the printer.
- On the Color Management Tab, we suggest having the Color Mode set to Vibrant.
- When you’ve confirmed all of your settings, Hit Print.
How to Press It:
- Turn your press on and set the temperature to 380 degrees Fahrenheit and the time to 1 minute (60 seconds).
- Prepare your clipboard with a lint free cloth and alcohol to remove any fibers or fingerprints.
- Place your design face down on the clipboard and tape it down.
- Place the clipboard on the lower platen of the press with the printed page on top.
- Place a piece of blowout paper on the bottom and top.
- Close the press and wait 60 seconds before opening the press and removed the pressed clipboard.
Tips & Tricks:
- Please read assembly instructions on the dealer page. Most clipboards need tools to add in the clip portion.
- This would make a great gift with some favorite snacks tied to the clipboard with a ribbon and a note from the student.
We released a new version of the Sawgrass Print Utility on Tuesday, March 26, 2024. In this release, you’ll see bug fixes including:
- Resolved ‘Ink Rescanning’ icon continuously spinning.
- Resolved ‘Choose Ink Type’ button displaying ‘Please Wait’ persistently.
- Resolved error when trying to print an SVG file.
- Other bug fixes and performance enhancements.
There will also be three new features included in the release.
Recents
With recents, users will now be able to re-print jobs they had previously sent to Sawgrass Print Utility. It does not matter how jobs were sent to the Sawgrass Print Utility, if the jobs were then sent to the printer, the file will be saved and can be accessed from the Recents icon in the Sawgrass Print Utility. Customers control how many jobs are saved and they can also access what settings were used for these jobs.
Shortcuts for Menu Items
All functions in the print utility menus will now have keyboard shortcut functionality. The shortcuts for each can be seen through any of the pull down menus in the Sawgrass Print Utility.
Guides Added to Help Menu
Two new guides have been added to the print utility. From the Help Menu, you’ll be able to open a Tech Tip and a Press Guide. The Tech Tip will change periodically and will feature information that will be handy to view in Sawgrass Print Utility. Currently, this is information on the printer LCD messages that will be seen for ink levels. The second guide offers the suggested Time, Temperature, and Pressure settings for various product materials. While the information provided by the dealer for the specific product being pressed is always the most accurate, these recommendations are useful when that information is not available. While both guides have mirror off to assist in reading, mirror can be turned on and the guides printed and pressed so they will always be at hand.
For more information on this release, check out our What’s New page on our website.

Sublimation paper is a special paper designed to hold and release the ink into gas when exposed to heat. There’s an extra layer on the paper designed just for holding, rather than absorbing, sublimation ink.
The Basics of Sublimation Paper
You should know that sublimation transfer paper is NOT the same as that plain copy paper you might already have in your copier or regular inkjet printer, even though it might look the same at first.
A good sublimation paper has three things:
- The coating can make sure the ink won’t permeate into paper. If the ink permeates into paper, it will waste much of the ink.
- It withstands the high heat of your heat press machine.
- It efficiently releases the dyes into your surface when heated.
Each of these is important for the sublimation process and getting the best results!
There are a lot of different sublimation papers on the market, and you may be wondering what’s best to use and what’s better off avoided in your heat transfer printing projects.
How are Sublimation Papers Different from Each Other?
So what’s the difference between them all? There are lots of general sublimation papers that will work for a variety of surfaces.
The “right side” of sublimation paper is the one that is pure white, without any printing on it. This is the side that you print on. So pay attention that you load your paper the right way into your paper tray. In the main tray of the printer, you’re putting the side you’ll print onto face down.
You often see a number mentioned on the package, which refers to the weight of the paper. Here is an example:
125G in your paper name stands for 125 grams per square meter and it’s the heaviest sublimation paper. The heavier the paper and the thicker the coating, the better it will hold the ink and saturate your surface — if you want full color, vibrant designs, go for the heavier weight.
It also has a very high transfer rate, meaning that most of the sublimation ink will transfer from the paper to the surface. 125g sublimation paper also has a greater durability than the thinner paper and holds up well under the heat press. This heavier paper can also cause issues with rigid and hard surfaces (hard substrate), as the ink has nowhere to go and can blur or ghost — if this happens, you can use a thinner paper.
105G in your paper name is the one hundred and five gram paper, and it’s the lightest sublimation paper. So now you may be wondering why we’d want lighter paper if heavier gives the best and most saturated color. Well, it turns out that light sublimation paper holds a little less ink and this is better when you’re making seamless designs, like our full-color sublimation tumbler. But keep this in mind, the thinner paper is more likely to curl with high temperatures and it doesn’t do as well with heavy ink saturation: this may affect the look, of your surface into dull and faded… so in this case, you could use better the heavier paper to get more ink on it and more ink on your surface.
So WEIGHT of sublimation paper is a big factor. Another factor can be the compatibility of the paper with your printer. For example, TruePix paper is optimized to work with Sawgrass sublimation printers. It’s 120 grams and works on a variety of surfaces.
Why You Need Sublimation Paper
Now, you may have heard of people using regular paper for sublimation, for example laser copy paper. It’s possible to use laser copy paper because it’s formulated to withstand the high heat of your heat press. The question is if inkjet heat transfer paper can hold and release the ink well enough, however.
Some people ask me if you can use photo paper for sublimation: I can say this: photo paper cannot withstand the high temperature of your heat press, so this is a no-go. My experience is, that when you want the best results for your printed products, please stick with the sublimation paper to print on! In some cases, you surely can try copy paper, but make sure you use some butcher paper or a cover sheet to protect your heat press from ink that is bleeding through the paper while pressing….
I did some 100% polyester products with prints made on copy paper and they came out fine, but keep in mind that not all products give good results! Sometimes you just have to play around!
Just a little example to show the difference in printing paper:
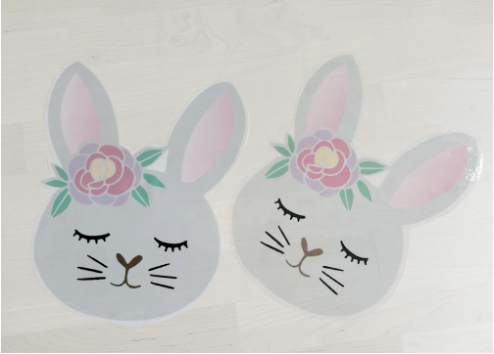
I printed the same design, with the same settings on this window sticker: the left one is printed on Texprint R sublimation paper, while the right one is printed on regular laser copy paper.
There truly is a difference in colors!
For macOS:
- Open System Preferences
- Select Printers & Scanners
- Verify the Sawgrass printer’s connection to the computer
- If listed but says Offline, ensure the cable is properly connected
- If issues persist, remove and re-add the printer. Click on the printer, not Print Manager, and click the minus (-) sign, then click the plus (+) sign to re-add.
- If problems persist, try resetting the printing system by right clicking or Ctrl+Click on a blank space in the list of printers and select Reset Printing System
(Note: Resetting the printing system clears all printers installed, providing a fresh start. This includes non-Sawgrass printers as well)
For Windows:
- Reinstall USB Printing Support driver to reinstall the printer driver
- Click the Start button, type Device Manager, and click to open
- Find Universal Serial Bus Controllers (USB), click on the carat (>), and locate USB Printing Support
- Right click and select Uninstall (do not worry, it will reinstall itself)
- If prompted, repeat the process for successful removal
- Once restarted, reboot your computer, or choose Action -> Scan for Hardware Changes in Device Manager
That’s it! You should now be all set and ready to move forward. Remember, we’re here if you need further assistance!
If you need further assistance with this process, or to see more detailed instructions with images, please see our article on our Care site.
This month, we are excited to feature one of our favorite DesignMate+ artists, Fernanda Melo Start (aka Fe Melo). Over the last couple of years, she has created some of our favorite designs including our Graduation Girls and some of our travel collection. Check out all of Fernanda’s art in DesignMate and learn more about her here in our interview!
Where did you grow up, and how did it influence your art?
I grew up in Sao Paulo, Brazil which is a pretty big metropoly and it’s super diverse full of immigrants, the city has no beach like rio, so people end up doing lots of cultural programs it was nice cuz you always have art exhibitions coming through and lots of local museums and galleries, also the city is covered in graffiti and street art so I think that definitely influenced me with i more pop urban style.
Who inspired your love of art?
I think it all started with a mix of influences. When I was a kid, my art teacher played a huge role. They showed me how to be creative even when resources were tight, which really stuck with me. Working with limited materials forced me to think outside the box. Plus, my mom was super supportive. She noticed my interest early on and constantly fueled my passion by getting me cool art supplies and books. It was her encouragement that kept me going.
How did you discover your talent for design?
So in university, I started off in fashion design. But I soon realized my true passion lay in graphic projects – you know, stuff like visual identity, prints, and illustrations. I found myself more at ease and in my element working on these graphic elements rather than designing clothes. So, I kind of naturally shifted towards graphic design and illustration as I went along.
How did you get started as an artist?
When I began my journey in graphic design, I quickly realized I wanted to add my own artistic touch into my projects. So, naturally, I started incorporating more illustrations and surface pattern designs. Surprisingly, the more I did, the more inquiries I received for these specific services. It’s funny, because ever since I was a kid, I’ve been passionate about art, but I never thought it could become a viable career path.
What would we find you listening/watching while creating?
Music and podcasts are huge for me. I’ve got quite an eclectic taste in music – it kinda depends on what I’m working on. I like tunes that vibe with the mood of my project, nothing too chaotic. Some of my go-to artists are Belle and Sebastian, Harry Styles, Queen, Beirut, Frank Sinatra, and of course some Brazilian music like O Terno, Caetano Veloso, Tim Maia, and Marisa Monte. When it comes to podcasts, I’m all about the creative ones like The Handsome Frank one and Design Matters. It’s great getting insights from other creatives while I’m working.
Any tips for breaking through a creative block?
Absolutely, for me having multiple personal projects going on simultaneously can be really beneficial. Right now, I’ve got three self-initiated projects in the works: a website aimed at helping beginners, an illustrated cookbook featuring my family recipes, and I’m also applying to participate in an art exhibition. It keeps things interesting and allows me to explore different creative avenues at once and when I feel I’m a little stuck and move on to the next one and then when I come back later things usually flow better.
How have you built confidence over the course of your career?
Well, building confidence for me hasn’t been a linear journey. There are definitely moments where I struggle with imposter syndrome, you know? But I’ve learned to push through by asking myself, ‘What’s the worst that could happen?’ I figure failing at something is better than never giving it a shot. Still, it can be tough sometimes, especially when you’re surrounded by so many incredibly talented people out there.
Where do you find inspiration for your art?
I find inspiration pretty much everywhere, both online and offline. I love the visuals of everyday life – whether it’s street signs, packaging, or just observing people around me. It’s amazing how much inspiration you can gather from the world around you!
What’s a piece of advice you would give young women creators looking to pursue a career in the arts?
For young women creators looking to pursue a career in the arts, my advice would be to dive deep into curiosity. Try out different workshops, experiment with various mediums, and immerse yourself in art history to understand different movements. Avoid looking for shortcuts because this journey is as much about personal growth as it is about your career. Remember, no amount of AI or technology can replace the fulfillment you’ll find in your own creativity and exploration.
Who inspires the collection you’ve designed this month?
The collection I’ve designed this month is all about celebrating women. I’m really into drawing women and capturing people in unexpected movements. So, for this collection, I wanted to showcase static figures in lively, dynamic dances. It’s all about bringing a sense of movement and rhythm to my art while highlighting the beauty and strength of women.
Why is it important to celebrate women creators?
Celebrating women creators is crucial because women make up a significant portion of the population and their voices deserve recognition. I believe women are incredibly strong and powerful, juggling responsibilities like home, children, and work with remarkable resilience. Throughout history, the male perspective has often dominated the narrative, leaving out the diverse experiences and viewpoints of women. It’s essential to acknowledge and celebrate women creators to ensure a more inclusive and accurate representation of the world. By opening up space for women’s voices and others, we enrich conversations and gain a deeper understanding of the human experience.
Thank you for your time today! If our viewers wanted to see more of your content, where can they find you?
You’re welcome! It was my pleasure. For more of my content, viewers can find me on Instagram @femelostark, on Behance @femelostark, and visit my website www.femelodesign.com. They can also check out my profile on 99designs.com/profiles/femelo and stay tuned for updates on my upcoming website: www.designforstarters.com. Thank you for your interest!
Want to use Fe’s designs? Use code FEMELO to get 30% off your first month of a DesignMate+ subscription.