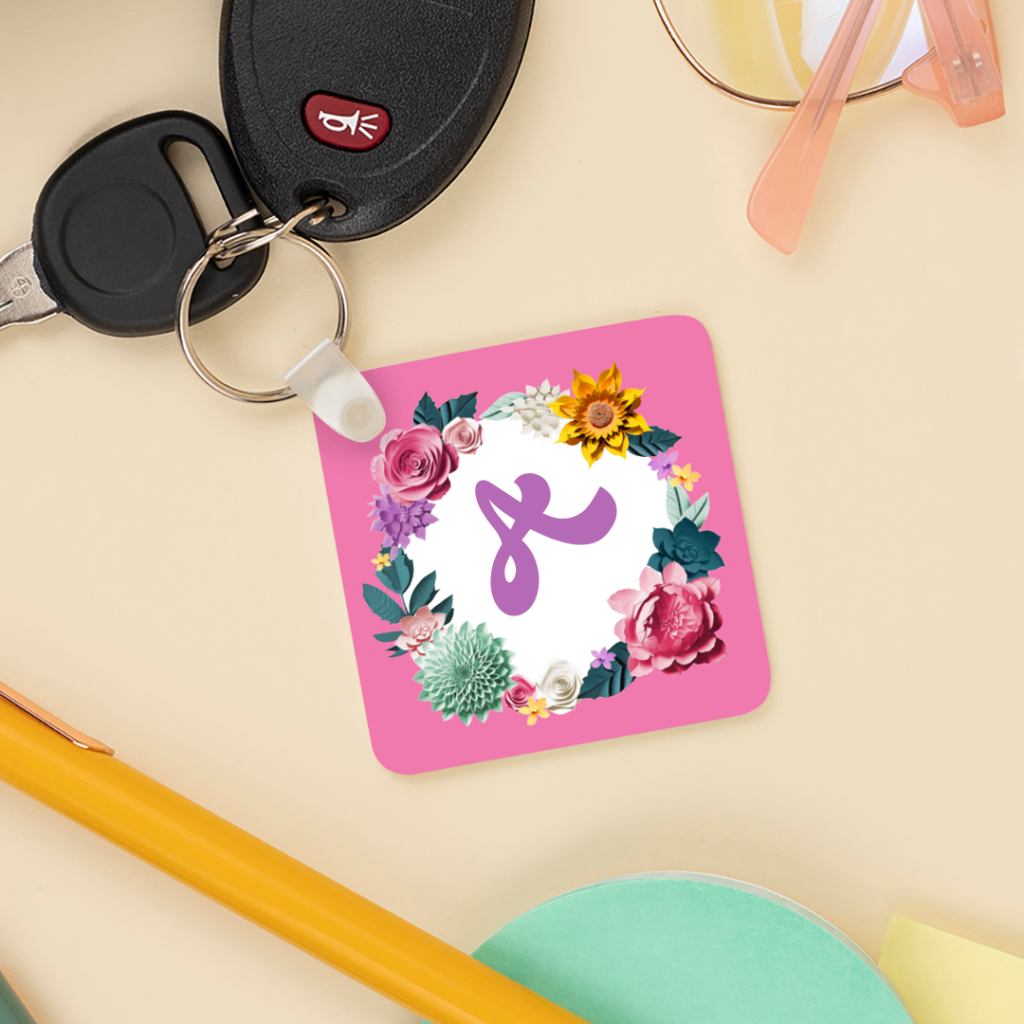
How to Make It: 3D Flower Keychain
This keychain featuring a 3D floral design is a great addition to any keyring!
Skill Level: Intermediate
Tools & Supplies to Make It:
- DesignMate+ Membership
- Sawgrass SG500 or SG1000 Printer
- Flat Press
- “8.5×11” or larger sublimation paper
- Keychain
- Alcohol and a lint free cloth
- Heat Tape
- Blowout Paper
How to Create It:
- Log into the Sawgrass Exchange and start a new creation in DesignMate.
- For your product, select the Plastic Square Keychain. It can be found under Accessories.
- On the Create Your Design Panel, click on Designs. Click on the filter icon and then select 3D Florals by Angie Holden and click apply.
- Choose the Pink Floral Wreath design.
- The image may need to be shrunk or moved, so use your mouse to lasso around the images and select them all as a group. Then, use the resize icon on the group to adjust size. It should stay centered.
- On the left side, go into text options to Enter a word or initial to go on the keychain. Once you have typed in the text box on the left, choose your font and change your fill color.
- For the font, you can use the filter panel to look for a script font you like. We chose Mama.
- We thought hex code #673495 was a great fill color for this palette.
- To add a design to the backside of the keychain, click on copy design at the top, make sure Side 2 is selected and then click Apply Design.
- We lassoed everything with our mouse and then deleted, leaving only the pink background on side 2.
- When your design is finished, hit the Continue button to move to the product details page.
- You’ll be prompted to name your design, put it in a Category folder, and then then hit save.
- On the Product Detail page, you’ll give the project a name and add a description, then hit print.
How to Print It:
- Make sure that you are seeing the popup to Open PrintMate and are hitting Open PrintMate. If you are not seeing this, you’ll need to disable your popup blocker.
- In PrintMate, start by scrolling down and making sure your print orientation is set to Portrait.
- For this project, you can use the preset Hardboard Keychain/Bag Tag.
- Make sure that the media size and type match what you have in the printer.
- You can use spacing under Design Files to move the images further apart.
- On the Color Management Tab, we suggest having the Color Mode set to Vibrant.
- When you’ve confirmed all of your settings, Hit Print.
How to Press It:
- Turn your press on and set the temperature to 400 degrees Fahrenheit and the time to 1 minute.
- Prepare your keychain with a lint free cloth and alcohol to remove any fibers or fingerprints.
- We will do each side at a time.
- Place your design face down on the keychain and tape it down.
- Place the keychain on the lower platen of the press with the printed page on top.
- Place a piece of blowout paper on the bottom and top.
- Close the press and wait 60 seconds before opening the press and removed the printed keychain.
- Once slightly cool, flip the keychain over and repeat the steps to press the other side.
Tips & Tricks:
- With smaller items, it’s usually easiest to keep the paper larger than the keychain and tape the keychain to the paper instead of the paper to the product like you do with larger items.
- You can increase the number of designs and use spacing to print multiple keychains at once.